AI-assisted ZEISS solution inspects implant coatings automatically Smith+Nephew is a medical technology group specializing in bone and tissue reconstruction, wound healing and joint replacement. Its site in Aarau, Switzerland, manufactures coated hip stem prostheses, among other products. For years, a ZEISS light microscope has been used to monitor whether the titanium and hydroxyapatite coatings applied in vacuum
chambers meet the strict tolerance specifications. An AI-supported software solution in combination with the ZEISS Axio Imager Z2m has also been in use since summer 2022. And this is paying off in Aarau in several ways.
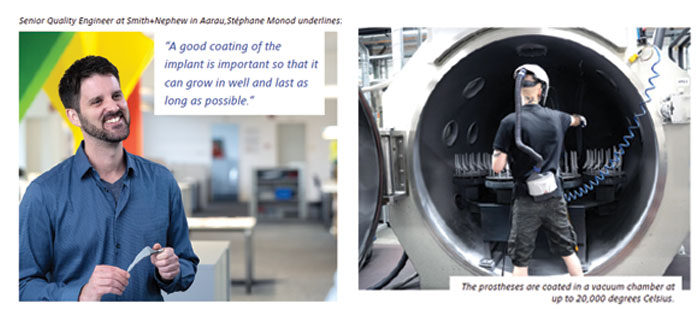
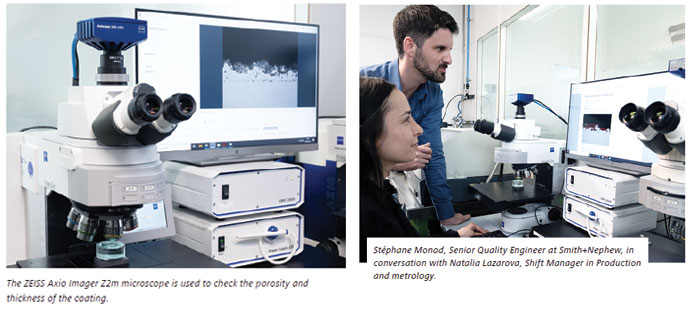
“It couldn’t be simpler,” says Stéphane Monod, responsible for quality at Smith+Nephew’s Aarau site and refers to the light microscope ZEISS Axio Imager.Z2m, in combination with the AIsupporting software. As proof, he places a polished sample of a test plate section embedded in acrylic resin on the examination table of the light microscope. After a brief alignment, he starts the ZEISS ZEN core software and thus the automated measurement process.
Seven minutes later, the software outputs an 18-page report with all the key data on the thickness and porosity of the coating of a hip implant.
“No matter how many times I or a colleague would examine this sample, the measurement results would always be the same,” explains the senior manufacturing quality engineer.
For medical technology companies, whose products are subject to the strictest quality specifications, this is “extremely helpful,” according to Monod.
Implant coatings for firm anchorage
More than 400,000 hip and knee prostheses are manufactured in Aarau each year. A large proportion of these are coated in the five state-of-the-art vacuum chambers at temperatures of up to 20,000 degrees Celsius. Purely with titanium or with titanium and hydroxyapatite. The latter is a bone substitute substance that improves or stimulates the ingrowth of the bone follicles into the porous surface of the prosthesis. In a hip prosthesis, for example, the prosthesis stem coated in this way bonds stably and elastically with the surrounding bone tissue.
This is an advantage for younger patients in particular. This is because, in the opinion of many orthopedists, the ingrowing hip prosthesis has an operative advantage over the cemented-in hip prosthesis in the event of a hip revision that may be required at a later date.
However, a certain layer thickness and porosity is necessary for a stable connection between bone and implant
Reproducible and accurate results
In the case of a so-called POLARSTEM for hip reconstruction, the required thickness of the applied titanium and hydroxyapatite layer is between 155 and 305 micrometre. For quality control, the London-based group has relied on the ZEISS Axio Imager light microscope at the site from the very beginning.
A total of five images (scenes) over one millimeter each are taken of the sample for this purpose. To be able to calculate the coating thickness, employees must manually draw a total of 50 vertical lines in the highly magnified images. The operator then has to insert the determined values into an Excel file and evaluate them.
The entire measurement and analysis process for a sample takes 45 to 60 minutes, if conducted manually.
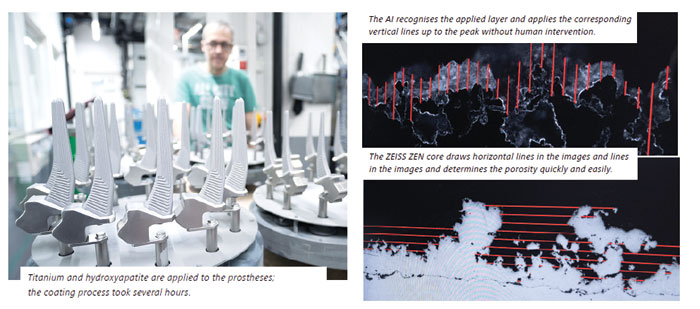
It is much faster with the AI-assisted solution that has been in use since summer 2022. Here, the values for coating thickness and porosity over a sample length of eight millimeters are available after just five to seven minutes. And since the device sets 343 vertical lines without operator intervention, the values determined are not only more reproducible, but also more accurate.

AI-assisted image segmentation
This significant acceleration of the measurement process is made possible by automated image segmentation. This is because without AI, dividing the image into specific areas requires a trained eye and a lot of human intervention. In this case, operators must draw a vertical line from the beginning of the slice to the peak at predetermined points in the images. Artificial intelligence, on the other hand, independently recognizes the applied layer and sets the corresponding vertical lines up to the peak without human intervention. For it to be able to do this, however, it must be trained in advance. Smith+Nephew provided ZEISS with corresponding dark- and bright-field images of the respective coatings of its products. In simple terms, the coatings were colored for the training.
As a result, the AI learned the properties of the area and created its own algorithm for classification. The algorithm was then applied to additional image data during training and, for Monod, provides “convincing results.”

Equipped for the future
The quality manager is enthusiastic about ZEISS Axio Imager Z2m with ZEN core. Also because with this device “future standard requirements can be met”. This is an important quality feature, because the bone can only grow well into the implant if there are sufficient voids.
This is because the AI-assisted solution determines not only the thickness but also the porosity of the applied titanium and hydroxyapatite layer during the seven minutes at POLARSTEM.
Until now, Smith+Nephew in Aarau was unable to determine the porosity, or could do so only at great expense. However, this is not a challenge for the new microscope.
The ZEISS ZEN core software sets horizontal lines in the images and automatically calculates the MVIL (Mean void intercept length) in order to quickly and easily determine the size of the voids or porosity. The porosity evaluation was performed according to the MED standard ASTM F1854 for medical implants.

Applications in the medical technology environment can also fulfil the requirements of FDA 21 CFR Part 11. The GxP toolkit available in ZEISS ZEN core is used for this purpose.
For process-safe manufacturing
Since the application of the coatings by vacuum plasma spraying (VPS) is highly complex, the manufacturing process is closely monitored. To avoid having to destroy the implants for this purpose, Smith+Nephew coats test plates for each job. Plates coated after the first ignition start of the torches are routinely examined microscopically on a daily basis. If manual tests with an outside micrometer show abnormalities in coating thickness during the course of production, these test plates are also cut open, embedded in acrylic and examined microscopically.
Track down possible sources of error more quickly.
According to Joel Dude, production engineer at Smith+Nephew in Aarau, this procedure “ensures high quality and stable production. The fact that the results are now available 10 times faster with the ZEISS Axio Imager.Z2m helps him to “track down possible sources of error more quickly”.
And because the measurements are automatic, meaning human error is excluded, “we no longer need to check this process in detail if there are problems.” For Dude, who is currently working on the process-safe commissioning of the fifth vacuum system, the new light microscope is therefore “an enormous help.

Open for Deep Learning
And since Smith+Nephew is known not only for its product quality but also for its innovative strength, Dude believes it is only a matter of time before the group, which operates in around 100 countries, launches new coatings on the market. With the new ZEISS solution, the Aarau site believes it is well equipped to meet the challenges of the future.
Also because ZEISS arivis Cloud allows them to train their own deep learning models for image segmentation in a user-friendly way and without any programming knowledge.
This is because at the heart of ZEISS arivis Cloud is a deep learning toolkit that enables automated segmentation and analysis of complex images. “It’s very user-friendly and will also speed up accreditation,” Dude said. Would he recommend the ZEISS solution to other companies? “Absolutely, but maybe not necessarily to our competitors.”


